Mastering Arduino Programming: A Comprehensive Guide
Arduino has become a cornerstone for hobbyists, engineers, and developers seeking to bring innovative projects to life. Whether you’re new to electronics or an experienced coder, learning Arduino programming opens a world of possibilities. This guide is designed to take you step-by-step through the essentials of mastering Arduino, with rich insights, tips, and strategies to ensure success in building your projects.
What is Arduino?
At its core, Arduino is an open-source electronics platform that combines hardware and software to make digital devices interact with the physical world. It is ideal for creating interactive projects because it is user-friendly, affordable, and highly customizable. Arduino boards read input from sensors, buttons, and other electronic components, allowing you to program them to perform specific tasks.
Why Learn Arduino Programming?
Arduino programming is an essential skill in the world of embedded systems. Whether you’re looking to automate processes, develop Internet of Things (IoT) devices, or prototype electronics, learning Arduino programming is a must. Here are some compelling reasons:
- Versatility: You can build a wide range of projects, from simple LED blinkers to complex robotic systems.
- Scalability: As you advance, you can integrate multiple boards and expand your project’s capabilities.
- Community Support: The Arduino community is vast, offering forums, tutorials, and open-source projects to help you troubleshoot and find inspiration.
Getting Started with Arduino Programming
Before diving into programming, you’ll need to acquire an Arduino board and install the Arduino Integrated Development Environment (IDE).
Step 1: Setting Up Your Arduino Environment
- Choose Your Arduino Board: Popular models include the Arduino Uno, Arduino Nano, and Arduino Mega. Each board has different specifications, so select one that matches the scope of your project.
- Download and Install the Arduino IDE: Head over to the official Arduino website and download the latest version of the Arduino IDE for your operating system. The IDE allows you to write, compile, and upload code to your board.
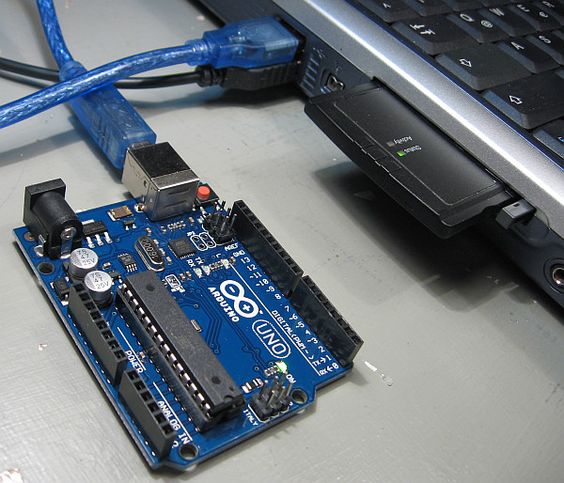
- Connect the Board to Your Computer: Using a USB cable, connect your Arduino board to your computer. Ensure the correct board and port are selected in the IDE under “Tools > Board” and “Tools > Port”.
Step 2: Understanding the Arduino Programming Language
Arduino uses a simplified version of C++, making it accessible for beginners while powerful enough for advanced users.
Basic Structure of an Arduino Sketch
Every Arduino program, known as a “sketch,” has two essential functions:
setup(): This function runs once when you start the program. It’s used to initialize variables, pin modes, and any necessary libraries.loop(): This function continuously runs after the setup, containing the main logic of the program.

Step 3: Writing Your First Program
Let’s start with a simple project: making an LED blink. This is one of the most basic yet important tutorials for understanding how Arduino works.
Wiring Your Circuit
- Components Needed:
- Arduino board (e.g., Arduino Uno)
- LED
- Resistor (220 ohms)
- Breadboard and jumper wires
- Connect the long leg (anode) of the LED to pin 13 on the Arduino board.
- Connect the short leg (cathode) to the GND pin on the board.
- Place a 220-ohm resistor between the LED and the pin to protect the LED from burning out.
Writing the Code

In this code, the pinMode() function sets pin 13 as an output. The digitalWrite() function controls the voltage on the pin, turning the LED on and off. The delay() function pauses the code for a set period (1000 milliseconds, or one second).
Step 4: Uploading the Code
Once your code is written, simply click the Upload button in the Arduino IDE. The program will be compiled and sent to the Arduino board, where it will start running immediately.
Key Arduino Programming Concepts
To advance in Arduino programming, it’s crucial to understand several key concepts and functions that are frequently used in projects.
1. Variables and Data Types
Variables store information in the program, such as numbers, text, or states. The most common data types in Arduino include:
- int: Stores integer values.
- float: Stores decimal values.
- char: Stores a single character.
- boolean: Stores either
trueorfalse.
2. Conditional Statements
Conditional statements like if-else control the flow of the program based on conditions.

3. Loops
Besides the main loop() function, you can use other loops like for and while to repeat sections of your code a specific number of times or until a condition is met.

4. Functions
Functions allow you to break your code into smaller, reusable chunks. You can create custom functions in Arduino by defining them outside of setup() and loop().

5. Serial Communication
Serial communication is essential for debugging and interacting with your Arduino. The Serial.begin() function initializes the serial port, and Serial.print() or Serial.println() allows you to send data back to your computer.

Advancing Your Arduino Skills
Once you’ve mastered the basics, the sky’s the limit. You can explore more advanced projects involving:
- Sensors: Temperature, humidity, and light sensors can be integrated into your projects for real-time environmental monitoring.
- Motors and Servos: Learn how to control DC motors, stepper motors, and servos for automation and robotics.
- Internet of Things (IoT): With Arduino-compatible Wi-Fi modules, you can connect your projects to the internet, enabling remote control and data logging.
Conclusion
Mastering Arduino programming is a journey that starts with simple projects and gradually expands to more complex systems. By learning the fundamentals, practicing regularly, and leveraging the rich resources available online, you’ll soon be able to build innovative projects that solve real-world problems. Arduino’s flexibility, affordability, and community support make it an essential tool for anyone interested in electronics and programming.


